Model Access Groups
Overview
Group multiple models under a single name, then grant keys or teams access to the entire group. Add or remove models from a group without updating individual keys.
Use cases:
- Separate production and development models
- Restrict expensive models to specific teams
- Organize models by provider or capability
- Control access to model families with wildcards (e.g.,
openai/*)
How It Works
Key Concept: Group models together → Attach group to key → Key gets access to all models in group
Step 1. Assign model, access group in config.yaml
model_list:
  - model_name: gpt-4
    litellm_params:
      model: openai/fake
      api_key: fake-key
      api_base: https://exampleopenaiendpoint-production.up.railway.app/
    model_info:
      access_groups: ["beta-models"] # 👈 Model Access Group
  - model_name: fireworks-llama-v3-70b-instruct
    litellm_params:
      model: fireworks_ai/accounts/fireworks/models/llama-v3-70b-instruct
      api_key: "os.environ/FIREWORKS"
    model_info:
      access_groups: ["beta-models"] # 👈 Model Access Group
- Key Access Groups
- Team Access Groups
Create key with access group
curl --location 'http://localhost:4000/key/generate' \
-H 'Authorization: Bearer <your-master-key>' \
-H 'Content-Type: application/json' \
-d '{"models": ["beta-models"], # 👈 Model Access Group
			"max_budget": 0,}'
Test Key
- Allowed Access
- Disallowed Access
curl -i http://localhost:4000/v1/chat/completions \
  -H "Content-Type: application/json" \
  -H "Authorization: Bearer sk-<key-from-previous-step>" \
  -d '{
    "model": "gpt-4",
    "messages": [
      {"role": "user", "content": "Hello"}
    ]
  }'
Expect this to fail since gpt-4o is not in the beta-models access group
curl -i http://localhost:4000/v1/chat/completions \
  -H "Content-Type: application/json" \
  -H "Authorization: Bearer sk-<key-from-previous-step>" \
  -d '{
    "model": "gpt-4o",
    "messages": [
      {"role": "user", "content": "Hello"}
    ]
  }'
Create Team
curl --location 'http://localhost:4000/team/new' \
-H 'Authorization: Bearer sk-<key-from-previous-step>' \
-H 'Content-Type: application/json' \
-d '{"models": ["beta-models"]}'
Create Key for Team
curl --location 'http://0.0.0.0:4000/key/generate' \
--header 'Authorization: Bearer sk-<key-from-previous-step>' \
--header 'Content-Type: application/json' \
--data '{"team_id": "0ac97648-c194-4c90-8cd6-40af7b0d2d2a"}
Test Key
- Allowed Access
- Disallowed Access
curl -i http://localhost:4000/v1/chat/completions \
  -H "Content-Type: application/json" \
  -H "Authorization: Bearer sk-<key-from-previous-step>" \
  -d '{
    "model": "gpt-4",
    "messages": [
      {"role": "user", "content": "Hello"}
    ]
  }'
Expect this to fail since gpt-4o is not in the beta-models access group
curl -i http://localhost:4000/v1/chat/completions \
  -H "Content-Type: application/json" \
  -H "Authorization: Bearer sk-<key-from-previous-step>" \
  -d '{
    "model": "gpt-4o",
    "messages": [
      {"role": "user", "content": "Hello"}
    ]
  }'
✨ Control Access on Wildcard Models
Control access to all models with a specific prefix (e.g. openai/*).
Use this to also give users access to all models, except for a few that you don't want them to use (e.g. openai/o1-*).
- Setup config.yaml
model_list:
  - model_name: openai/*
    litellm_params:
      model: openai/*
      api_key: os.environ/OPENAI_API_KEY
    model_info:
      access_groups: ["default-models"]
  - model_name: openai/o1-*
    litellm_params:
      model: openai/o1-*
      api_key: os.environ/OPENAI_API_KEY
    model_info:
      access_groups: ["restricted-models"]
- Generate a key with access to
default-models
curl -L -X POST 'http://0.0.0.0:4000/key/generate' \
-H 'Authorization: Bearer sk-1234' \
-H 'Content-Type: application/json' \
-d '{
    "models": ["default-models"],
}'
- Test the key
- Successful Request
- Rejected Request
curl -i http://localhost:4000/v1/chat/completions \
  -H "Content-Type: application/json" \
  -H "Authorization: Bearer sk-<key-from-previous-step>" \
  -d '{
    "model": "openai/gpt-4",
    "messages": [
      {"role": "user", "content": "Hello"}
    ]
  }'
curl -i http://localhost:4000/v1/chat/completions \
  -H "Content-Type: application/json" \
  -H "Authorization: Bearer sk-<key-from-previous-step>" \
  -d '{
    "model": "openai/o1-mini",
    "messages": [
      {"role": "user", "content": "Hello"}
    ]
  }'
Managing Access Groups via API
Access group management APIs only work with models stored in the database (added via /model/new).
Models defined in config.yaml cannot be managed through these APIs and must be configured directly in the config file.
Use the access group management endpoints to dynamically create, update, and delete access groups without restarting the proxy.
Tutorial: Complete Access Group Workflow
This tutorial shows how to create an access group, view its details, attach it to a key, and update the models in the group.
Prerequisites:
- Models must be added to the database first (not just in config.yaml)
- You need your master key for authorization
Step 1: Add Models to Database
First, add some models to the database:
# Add GPT-4 to database
curl -X POST 'http://localhost:4000/model/new' \
  -H 'Authorization: Bearer sk-1234' \
  -H 'Content-Type: application/json' \
  -d '{
    "model_name": "gpt-4",
    "litellm_params": {
      "model": "gpt-4",
      "api_key": "os.environ/OPENAI_API_KEY"
    }
  }'

# Add Claude to database
curl -X POST 'http://localhost:4000/model/new' \
  -H 'Authorization: Bearer sk-1234' \
  -H 'Content-Type: application/json' \
  -d '{
    "model_name": "claude-3-opus",
    "litellm_params": {
      "model": "claude-3-opus-20240229",
      "api_key": "os.environ/ANTHROPIC_API_KEY"
    }
  }'
Step 2: Create Access Group
Create an access group containing multiple models:
curl -X POST 'http://localhost:4000/access_group/new' \
  -H 'Authorization: Bearer sk-1234' \
  -H 'Content-Type: application/json' \
  -d '{
    "access_group": "production-models",
    "model_names": ["gpt-4", "claude-3-opus"]
  }'
Response:
{
  "access_group": "production-models",
  "model_names": ["gpt-4", "claude-3-opus"],
  "models_updated": 2
}
Step 3: View Access Group Info
Check the access group details:
curl -X GET 'http://localhost:4000/access_group/production-models/info' \
  -H 'Authorization: Bearer sk-1234'
Response:
{
  "access_group": "production-models",
  "model_names": ["gpt-4", "claude-3-opus"],
  "deployment_count": 2
}
Step 4: Create Key with Access Group
Create an API key that can access all models in the group:
curl -X POST 'http://localhost:4000/key/generate' \
  -H 'Authorization: Bearer sk-1234' \
  -H 'Content-Type: application/json' \
  -d '{
    "models": ["production-models"],
    "max_budget": 100
  }'
Response:
{
  "key": "sk-...",
  "models": ["production-models"]
}
Test the key:
# This succeeds - gpt-4 is in production-models
curl -X POST 'http://localhost:4000/v1/chat/completions' \
  -H 'Authorization: Bearer sk-...' \
  -H 'Content-Type: application/json' \
  -d '{
    "model": "gpt-4",
    "messages": [{"role": "user", "content": "Hello"}]
  }'

# This succeeds - claude-3-opus is in production-models
curl -X POST 'http://localhost:4000/v1/chat/completions' \
  -H 'Authorization: Bearer sk-...' \
  -H 'Content-Type: application/json' \
  -d '{
    "model": "claude-3-opus",
    "messages": [{"role": "user", "content": "Hello"}]
  }'
Step 5: Update Access Group
Add or remove models from the access group:
curl -X PUT 'http://localhost:4000/access_group/production-models/update' \
  -H 'Authorization: Bearer sk-1234' \
  -H 'Content-Type: application/json' \
  -d '{
    "model_names": ["gpt-4", "claude-3-opus", "gemini-pro"]
  }'
Response:
{
  "access_group": "production-models",
  "model_names": ["gpt-4", "claude-3-opus", "gemini-pro"],
  "models_updated": 3
}
The API key from Step 4 now automatically has access to gemini-pro without any changes to the key itself.
API Reference - Access Group Management
For complete API documentation including all endpoints, parameters, and response schemas, see the Access Group Management API Reference.
Managing Access Groups via UI
You can also manage access groups through the LiteLLM Admin UI.
Step 1: Add Model to Access Group
When adding a model to the database, assign it to an access group using the "Model Access Group" field:
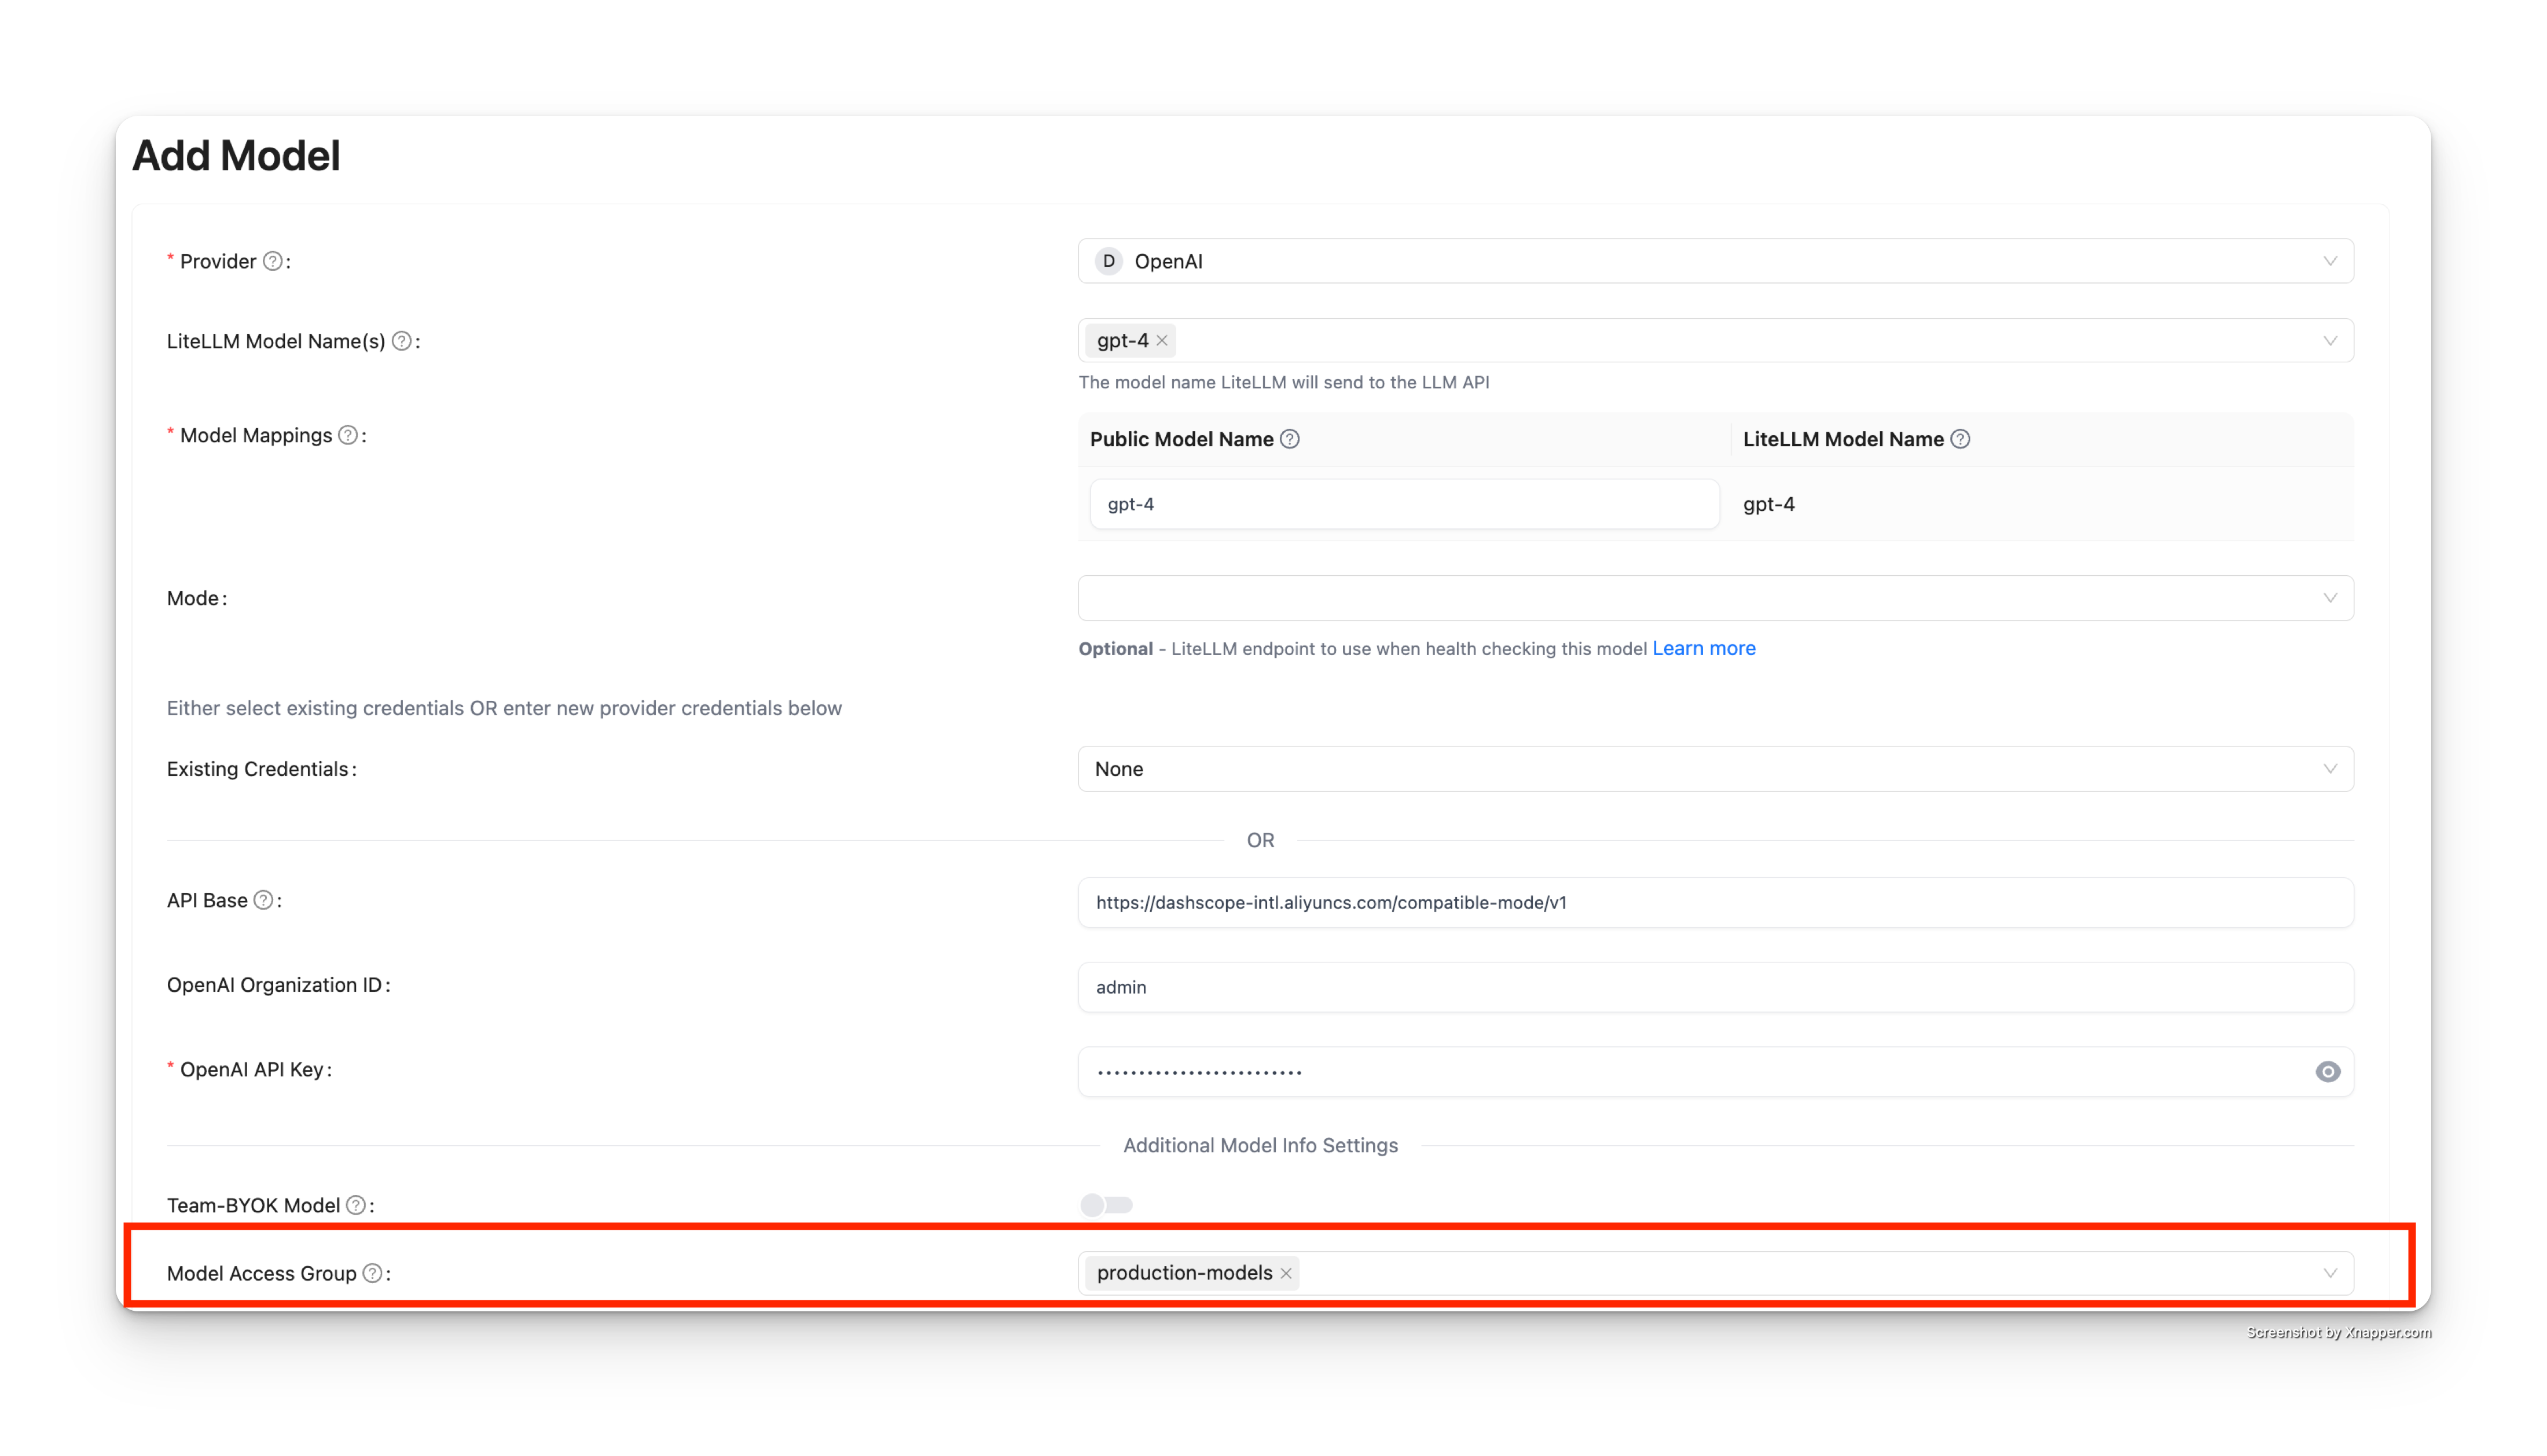
In this example, gpt-4 is added to the production-models access group.
Step 2: Create Key with Access Group
When creating an API key, specify the access group in the "Models" field:
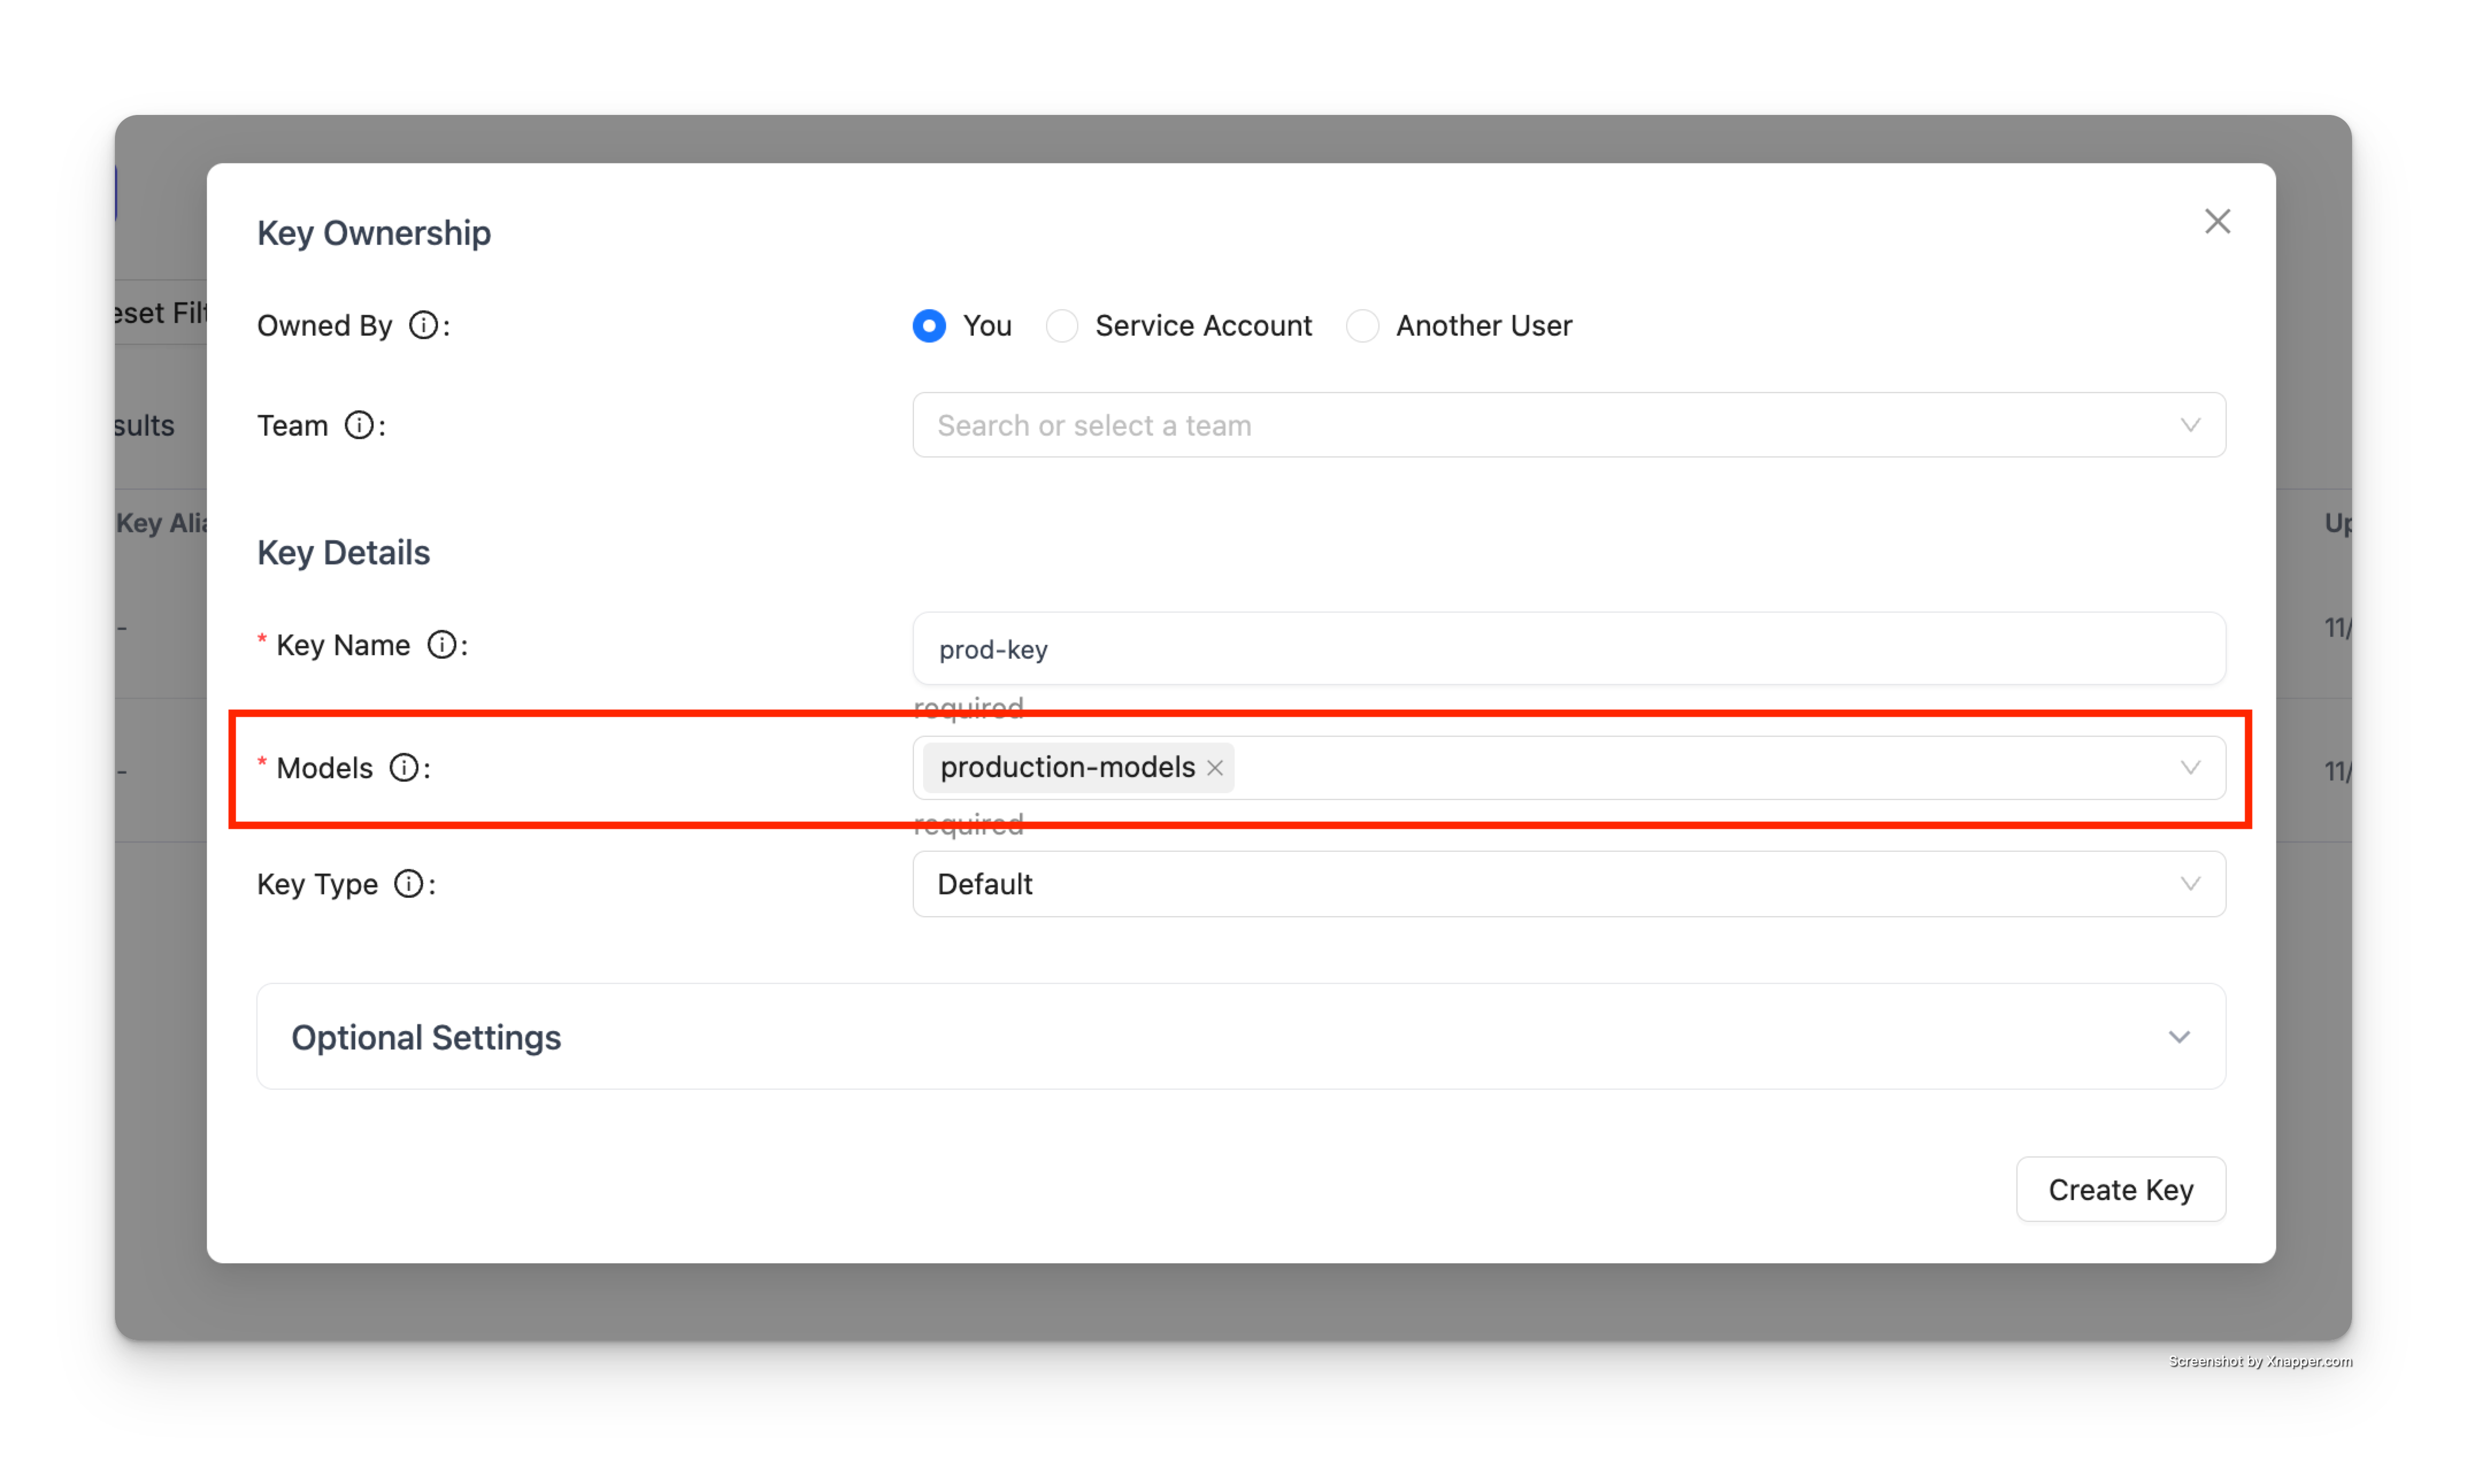
The key will have access to all models in the production-models group.
Step 3: Test the Key
Use the generated key to make requests:
# This succeeds - gpt-4 is in production-models
curl -X POST 'http://localhost:4000/v1/chat/completions' \
  -H 'Authorization: Bearer sk-...' \
  -H 'Content-Type: application/json' \
  -d '{
    "model": "gpt-4",
    "messages": [{"role": "user", "content": "Hello"}]
  }'
Response:
{
  "id": "chatcmpl-...",
  "object": "chat.completion",
  "created": 1234567890,
  "model": "gpt-4",
  "choices": [
    {
      "index": 0,
      "message": {
        "role": "assistant",
        "content": "Hello! How can I help you today?"
      },
      "finish_reason": "stop"
    }
  ]
}
If you try to access a model not in the access group, the request will be rejected:
# This fails - gpt-4o is not in production-models
curl -X POST 'http://localhost:4000/v1/chat/completions' \
  -H 'Authorization: Bearer sk-...' \
  -H 'Content-Type: application/json' \
  -d '{
    "model": "gpt-4o",
    "messages": [{"role": "user", "content": "Hello"}]
  }'
Response:
{
  "error": {
    "message": "Invalid model for key",
    "type": "invalid_request_error"
  }
}